How To Exposed Aggregate Concrete?
Overview
Welcome to the intriguing world of exposed aggregate concrete! Whether you’re looking to jazz up your driveway, spruce up your sidewalks, or add a unique touch to your patio, exposed aggregate concrete Adelaide could be just the ticket.
This finishing technique, revealing the smooth and colourful stones beneath the concrete’s surface, looks fabulous and offers durability and slip resistance. Whether you are a DIY enthusiast or a budding contractor, this comprehensive beginner’s guide will walk you through the essential materials, techniques, and tips to achieve stunning exposed aggregate finishes. Let’s dive in!
What is Exposed Aggregate Concrete?
Exposed aggregate concrete Adelaide is a decorative style where the top layer is removed to reveal the aggregates, such as sand, pebbles, and small stones, beneath. This technique provides a textured and colourful finish that goes beyond the monolithic appearance of traditional concrete. The process of achieving this look involves mixing, pouring, and then either washing away or mechanically removing the concrete’s outer’ skin’ to unveil the aggregates’ natural beauty.
Benefits of Exposed Aggregate Concrete
Opting for an exposed aggregate finish comes with several advantages. Firstly, it significantly enhances the aesthetic appeal of the concrete, adding depth and character to pavements, driveways, pool decks, and more. This technique allows for a customisable look, as you can choose from various aggregates in different colours, shapes, and sizes. Additionally, exposed aggregate concrete surfaces are known for their durability and nonslip texture, making them an ideal choice for outdoor applications. The maintenance of these surfaces is relatively straightforward, requiring only periodic sealing to maintain their appearance and durability.
Materials Needed for Exposed Aggregate Concrete
Essential Materials
To embark on creating an exposed aggregate concrete surface, you’ll need to gather a few essential materials:
- Concrete Mix: Choose a high-quality concrete mix suitable for exposed aggregate applications. It’s crucial to ensure that it adequately supports the weight and type of aggregates you plan to use.
- Aggregates: These could be anything from pebbles and crushed stone to coloured glass and seashells, depending on the desired finish. The size, colour, and aggregate type significantly influence the finished surface’s overall look.
- Water: Needed for mixing the concrete, it’s essential to use clean water to prevent contamination that might affect the setting process.
- Concrete Sealer: A high-quality sealer protects the exposed aggregate surface from weathering, staining, and water damage. It also enhances the colour and appearance of the aggregates.
- Safety Gear: Always wear protective equipment such as gloves, eyewear, and a dust mask when working with concrete to avoid harm from caustic materials and airborne particles.
Optional Materials
While the essential materials for aggregate concrete Adelaide will get you started, a few additional tools and supplies can make the process smoother and expand your creative options:
- Colorant: If you’re looking to customise the colour of the concrete itself, concrete colourants can be mixed into the batch before pouring. This can add an extra dimension to your project.
- Retarder: A surface retarder can be applied to the concrete’s surface to slow down the setting time of the top layer. This allows for easier removal of the surface to expose the aggregate beneath.
- Pressure Washer: For washing away the top layer of concrete to reveal the aggregate, a pressure washer is highly effective and provides a uniform finish.
- Concrete Edging Tools: These help create clean and precise edges around the project area, lending a professional look to the finished surface.
By understanding what exposed aggregate concrete Adelaide is and what materials are necessary for its creation, you can confidently embark on your project. Gathering suitable materials and tools before you begin will streamline the process, allowing you to focus on the creative and functional aspects of working with exposed aggregate concrete.
Whether you’re enhancing a home driveway, updating a garden path, or adding a decorative touch to a patio, exposed aggregate concrete offers a unique, durable finish that stands out.
Techniques for Achieving Exposed Aggregate Concrete
Creating exposed aggregate concrete is an art and a practical construction technique, offering a durable and aesthetically appealing surface. Using various methods, you can expose the aggregate (stones, pebbles, and sand) in the concrete to create beautiful, textured finishes.
Preparation Steps
The preparation stage is crucial for the success of your exposed aggregate project. Begin by selecting the type and size of aggregate you want to expose. This choice will significantly influence the final look of the concrete, from smooth river pebbles to colourful glass bits.
Next, prepare the base where the concrete will be poured. Ensure it’s compact, level, and free of debris. Install proper formwork to the desired shape and height of your project. Additionally, consider the weather conditions—too hot, cold, or wet can affect the concrete’s curing process unfavourably.
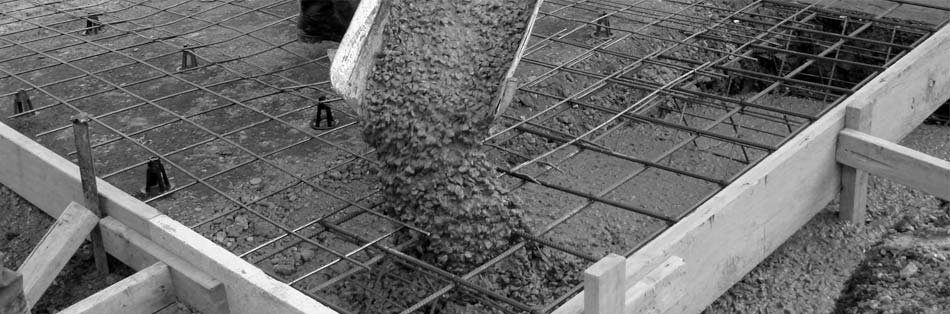
Pouring and Placing Aggregate
Pouring the concrete takes careful planning and execution. Mix your concrete according to the manufacturer’s instructions, aiming for a consistency that’s easy to work with but not too runny. Once mixed, pour the concrete into the prepared forms, spreading it evenly.
For adding aggregate, there are a couple of methods:
Mixed In The aggregate is mixed into the concrete before it’s poured. This is simpler but gives you less control over the final appearance.
- Seeded: After pouring the concrete base layer, the selected aggregate is scattered (seeded) over the top and lightly pressed into the surface. This method offers more control over the distribution and appearance of the aggregate.
- Finishing Techniques: Once the concrete is poured and the aggregate placed, it’s time to expose it. This can be done through several methods:
- Water Washing and Brushing: Once the concrete has started to set but is not fully hard, gently spray water over the surface and scrub with a broom to remove the thin layer of concrete over the aggregates.
- Chemical Retarders: A more controlled method involves applying a chemical retarder to the surface of the concrete immediately after placing the aggregate. This delays the setting of the top layer of concrete, which can then be washed away the next day, revealing the aggregate underneath.
Allow the concrete to cure as per the standard practices, keeping it moist to prevent cracking. The curing period can vary but typically takes about a week.
Tips for Successful Exposed Aggregate Concrete Projects
Achieving a stunning exposed aggregate finish is not just about following steps—it’s also about knowing the little tricks that can make a big difference. Here are some tips to help ensure your project turns out just as you envision:
- Test Your Techniques: Before going full scale, do a small test in an inconspicuous area or on a sample piece. This will help you understand the process and adjust your technique as needed.
- Choose the Right Aggregate: The aggregate’s type, size, and colour can dramatically impact your project’s look. Spend time selecting an aggregate that complements the overall design.
- Mind the Weather: Concrete is sensitive to weather conditions. Ideal temperatures for working with concrete are between 50°F and 60°F (10°C and 15°C). Avoid pouring concrete on extremely hot or cold days.
- Use Quality Materials: Don’t skimp on the quality of concrete and aggregate. Higher quality materials not only look better but are also more durable.
- Seek Professional Advice: If you’re new to working with concrete, don’t hesitate to consult with a professional. They can offer valuable insights and suggestions based on their experience.
These techniques and tips can produce a beautifully finished exposed aggregate concrete project. Whether you’re tackling a driveway, a patio, or a decorative pathway, the textured, natural look of exposed aggregate concrete can enhance the aesthetic appeal of your outdoor space. Happy building!
Conclusion
Creating exposed aggregate concrete surfaces can offer a unique charm and durability to your outdoor spaces. Whether you’re aiming for a pathway, driveway, or patio, this project can elevate the look of your home. By following the steps laid out, choosing the suitable materials from the reputable aggregate concrete Adelaide provider, and using appropriate techniques, you’ll have a beautiful, textured surface that’s eye-catching and long-lasting. Remember, patience and attention to detail are your best tools in achieving the perfect exposed aggregate finish. Happy crafting!
Related Posts

Unlocking Wealth: The Essential Guide to Capital Gains Tax Services

Crafting Your Home: The Art of Choosing the Right Cabinet Maker
